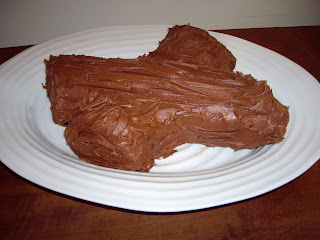
I am a massive fan of Christmas. And all things Christmassy. So naturally I was super excited when I was invited to a "Christmas in July" event by one of my former colleagues. Not only was it a great chance to catch up with some friends, I also had the opportunity to bake something Christmassy at a time other than Christmas...
It's worth noting that despite my best intentions of getting creative, I tend to revert to the classics at Christmas - pudding, fruit cake, shortbread... The more intricate, interesting Christmas cookies and desserts don't really tend to work in the hot climate. I have always wanted to make a traditional French Buche de Noel - a chocolate iced log - and Christmas in July seemed like the perfect opportunity to do it. It's too rich to eat in 40 degree heat - you need icy cold weather to appreciate the special nature of this dessert.
I scoured the internet for a great recipe, and after realising most of the recipes were essentially the same, I reverted to the standard for all things chocolatey: La Reine Nigella.
Given the party I was going to had a couple of dozen attendees, I thought I would increase the recipe a little: I upped the cake by 50% and baked it in a larger tray but you could stick to the original recipe (below) if you had a smaller number of people. The original recipe calls for you to use the icing as the filling as well, but I wanted to do something a little more interesting so I devised my own.
It was an awful lot easier than I expected. It does take time so plan accordingly and don't forget to allow the cake to cool completely before attempting to assemble. 2 hours between baking and rolling should do it.
I also baked mini cinnamon and chocolate mince pies for the party that were sensational - if you are looking for an alternative to the usual festive pie I can highly recommend it!

Buche de Noel
adapted from Feast by Nigella Lawson
Serves 8
for the cake
6 eggs, separated
150g caster sugar
2 teaspoons real vanilla extract
50g unsweetened cocoa powder (I use Green and Blacks Organic)
for the icing
100g bittersweet chocolate (I used Lindt 70%)
250g icing sugar
225g butter
1 tablespoon real vanilla extract
3-5 teaspoons icing sugar for “snow”
for the filling
120ml thickened cream
150g sweetened chestnut puree or creme de marron (I used Bonne Maman)
Preheat the oven to 180 C degrees. Line a swiss or jam roll with parchment paper leaving a generous overhang at the ends.
In a large bowl, whisk the egg whites until foamy and thick. Then add a third (50g) of the sugar and continue whisking until the whites hold peaks.
In another bowl, whisk the egg yolks and remaining sugar until pale yellow and thick. Add the vanilla and sift in cocoa powder before gently folding to incorporate. Next, fold a few tablespoons of the egg whites into the yolks, before gently folding in the remaining whites in thirds, making sure you lose as little of the air as possible from the mixture. Pour the cake mixture into the lined cake pan and bake for twenty minutes. It will puff up quite a lot, but don't worry, it will settle when you pull it out of the oven. Test that the cake is done and remove to a baking rack. Let the cake cool a little before turning it out onto another piece of baking parchment. Allow to cool fully before attempting to ice and fill.
In a bowl placed over a pan of boiling water melt the chocolate. Allow to cool. In a kitchen whizz or food processor blend the softened butter, vanilla and icing sugar until smooth. Add the cooled chocolate and blend until well combined.
In another bowl, whisk the cream until soft peaks form. Add the creme de marron (chestnut puree). Stir until combined.
To assemble the log, spread the chestnut cream over the cake in a thin layer. You can either roll the cake from the short end or long one, I rolled it from the long end to make a longer log. The most important thing is to make sure the seam of the roll (the edge) is at the bottom of the cake so it doesn't attempt to unroll. Don't worry about the cake cracking - it's fairly pliable and any cracks can be covered with icing. Place the cake on the plate on which you wish to serve it, seam down.
Now, slice two pieces from the log on a diagonal - one triangular piece from each end. Using the chocolate icing, attach one of the pieces to each side of the roll, making it look more log-like. Using a palette or butter knife, spread the rest of the icing over the cake roughly (including the ends), so that the icing looks a little like bark. Using a skewer, you can also make tree-style markings on the log and circles on the cut ends to make it look more log-like. Just before serving dust with sugar and then eat with enthusiasm! Share with your seven closest friends.
Kitty
5 comments:
oh that looks so good. yum!!
I love this recipe too! I made a mocha one and it was so light and delicious. Yours looks perfect! :D
Ooooh - a mocha version would be amazing! Clare - it was sensational!
Wow - great work, Miss Kitty!! It looks delicious.
Thanks for the idea about the pies.
SSG xxx
That looks incredible... Oh my poor thighs.
Post a Comment